
|
coloring - method one
(scanned as line art/drawing) |
coloring - method two
(scanned as grayscale/photo) |
Coloring - Method One
when your art is scanned as line art/drawing
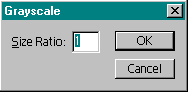
 First, go to "image" and change your "mode" from bitmap to grayscale. A menu will pop up allowing you to type in your grayscale size ratio. By default, it should say 1. If so, just click OK.
Then go back to "image", "mode" and select "RGB"... this will get you ready for creating your web graphic in color.
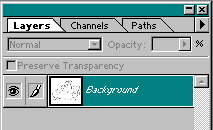 Double click the italicized word "background" in your Layers palette. Your "Make Layer" menu will pop open allowing you to name that layer. Name it "line" and then Click OK. Separating your line this way keeps it safe and out of the way, so you can color and recolor, on another layer, without touching your original.
Click your Zoom Tool (looks like a magnifying glass in your tool bar) and zoom in real close to any area in your drawing which is black. Switch to your Magic Wand tool and click on (select) one of the black areas. This will add a "dancing ants" selection to that area. To select all of the black areas in your drawing, while the selection is still on, go to "Select" and then "Similar". You might be too close to notice, but now all the black in your drawing is selected. Go to "Select", "Inverse" and then hit your "Delete" key on your keyboard. This will remove everything that is not black - in other words - all your white paper area.
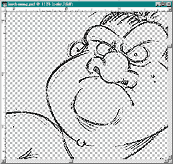
Now your image is transparent and ready for coloring. Zoom out until you can see your entire drawing. Go to "Select", "Deselect" to get rid of the dancing ants, or click the shortcut Ctrl+D on your keyboard.